
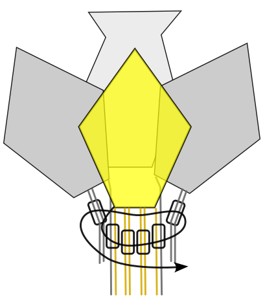
Flower Architecture
Before proceeding with detailed instructions, I’d like to illustrate the various steps for constructing the flower.
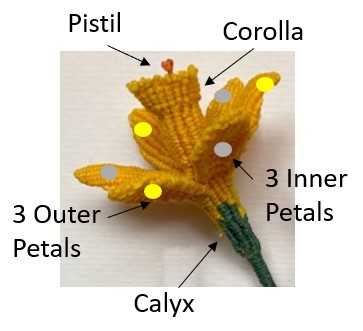
We will use the terms indicated in the figure.
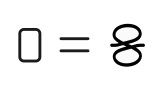
The macrame knot used in this project is the Vertical Double Half Hitch (VDHH). To facilitate reading the daffodil diagrams, it will always be represented by a rectangle.
We start by making 3 ‘internal’ petals, as per the instructions in the dedicated section.
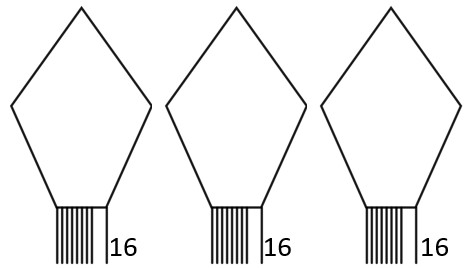
Each completed petal will have 16 vertical anchor cords. Eight of these cords will be used for the calyx and are put aside, the other 8 are used to work the corolla.
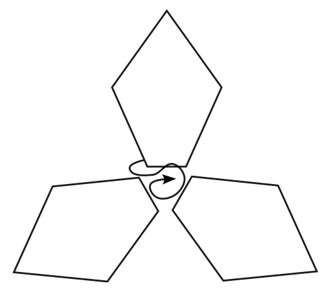
Using these 8 anchor cords, the three petals are joined and worked circularly until the corolla is completed.
The three ‘external’ petals are then made and each of them will have 16 vertical anchor cords. Eight of these cords will be used for the calyx, the others can be cut.
The external petals are inserted between an internal petal and the next, overlapping the last anchor cord of the previous petal with the first anchor cord of the next petal and making a VDHH with the knotting cord.
We then proceed to knot the calyx in a circular manner.
Once the calyx is finished, insert the orange cord for the pistil and a supporting wire, which will be blocked when knotting the stem.
Materials
Linhasita 0,75 mm golden yellow (COR 218) for the flower.
Cord measurements for each petal (3 internal and 3 external) are shown in the table. Please note that in the diagrams of this tutorial cords are all numbered from 1 to 8 and there is correspondence between the cord’s role and its length.
| Internal Petal | External Petal | |||
| cord # | used for: | CM | used for: | CM |
| 1 | Petal + Calyx | 30 | Petal + Calyx | 30 |
| 2 | Petal + Corolla | 40 | Petal | 20 |
| 3 | Petal + Corolla | 40 | Petal | 20 |
| 4 | Petal + Calyx | 30 | Petal + Calyx | 30 |
| 5 | Petal + Calyx | 30 | Petal + Calyx | 30 |
| 6 | Petal + Corolla | 40 | Petal | 20 |
| 7 | Petal + Corolla | 40 | Petal | 20 |
| long 8(*) | Petal + knotting cord corolla | 260 | Petal + knotting cord calyx | 190 |
| short 8 | Petal | 80 | Petal | 80 |
(*) Cord 8 “long” is only needed for the first petal, the other two use cord 8 “short”.
Linhasita 0,75 mm Orange (COR 387) for the pistil: approximately 25 cm.
Linhasita 0,75 mm Fir Green (COR 367) for the stem and leaves:
Calyx + Knotting of the Stem: 180cm (60cm for the calyx+ 120cm for the stem).
In this Project the stem is tied using the Tatting Knot. An alternative is to wrap the green thread neatly around the metal wire and then secure it with glue.
Leaf of approximately 15 cm: 4 cords of 160cm.
You will also need some metal wire:
1mm thick to reinforce the stem: approximately 25cm
0.4 mm thick to strengthen the leaves: approximately 20 cm
Instructions Petals
All petals are made in the same way. The macrame thread used is yellow for all cords. The colors used in the figures serve only to better visualize the knotting- and the anchor– cords.
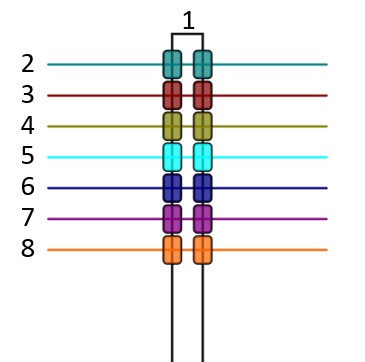
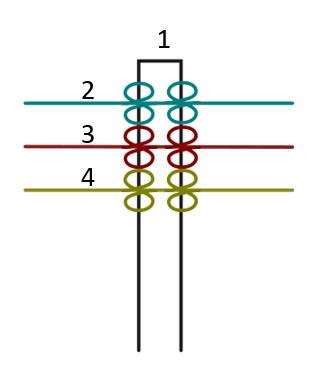
Fold cord 1 in half and secure it with a pin on the macrame board. This cord will only be an anchor cord.
For cords 2, 3, 4, 5, 6, and 7 proceed as follows:
Place the half length in the center of the folded cord 1 and make two VDHH, one on the left and one on the right, as shown in the figure.
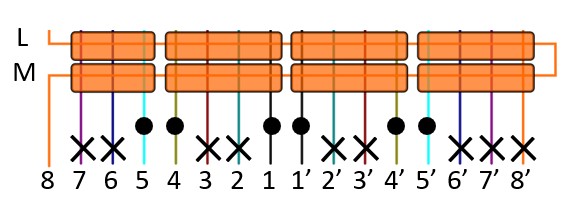
The cord number 8 is longer because it will be also used as a knotting cord and it must be tied leaving 10 cm on the right, and the remainder on the left (250cm or 70cm for internal petals, 180 or 70 cm for external ones).
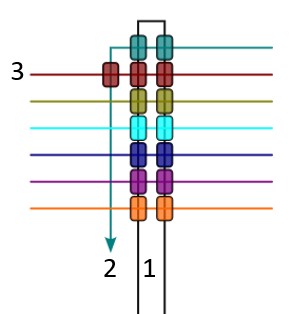
Now we work the left part of the petal. Turn cord 2 downwards as anchor cord and make a VDHH with cord 3.
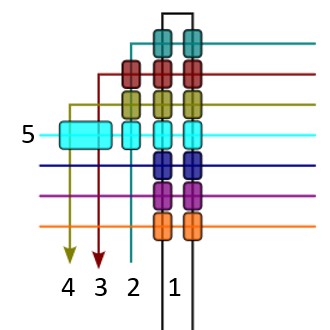
Continue with cord 3 and 4, turn them downwards. In order to shape the petal, these two cords are taken together as anchor and the VDHH is made with cord 5 on them.
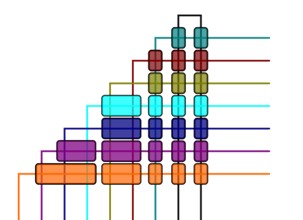
Proceed like this, gradually directing all the cord downwards, as indicated in the figure. Note that also cord 5 and 6 are taken together as anchor.
Once the left side is done, the right side needs to be worked symmetrically.
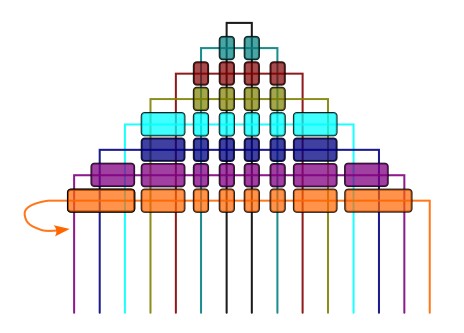
At the end of this step, we completed seven rows. From now on, cord 8 on the left will be used as knotting cord.

With reference to the figure, the seven completed rows are up to row G included. Let’s proceed row by row.
Row H – It is done from left to right with thread 8 now acting as a knotting cord. It is identical to line G, apart that cord 8′ needs to be included in the last knot.
Row I – It is performed from right to left and it is identical to H.
Row J – Begin to merge cords so to narrow the petal shape. Cords 1 and 2 are merged as anchor of a single knot and same thing for the symmetrical cords 1′ and 2′.
Row K – Same knots as row J.
Row L – The bundles of cord 1,2,3 and 4 are further merged into a single node. Same thing for the symmetrical cords 1′, 2′, 3′, 4”.
Row M – Same knots as row L.
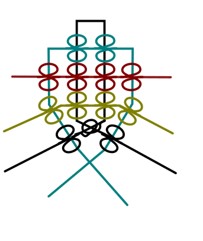
Instructions Corolla
After completing the 3 internal petals following instructions in the previous section, proceed as follows.
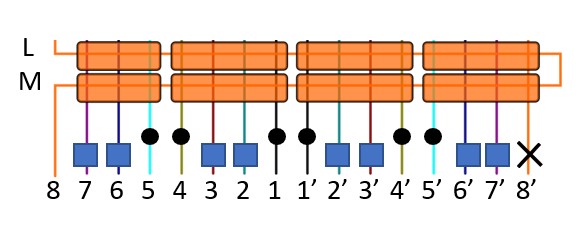
Each petal ends with 4 knots, each with 4 anchor cords (except the first which actually has 3 anchor cords + the knotting cord).
To make the corolla we will take cords 2, 3, 6 and 7 and their symmetrical ones 2′, 3′, 6′, 7′. They are indicated in the figure with a small square.
Cord 8 (long) of the first internal petal will be the corolla knotting cord.
To avoid interfering, the other cords can be tied behind the work and will be used later for making the calyx.
The corolla is the continuation of the 3 petals, on the front side of the work.

Row N – With (long) cord 8 of the first petal, knot cords 7, 6, 3 and 2 of first petal (P1) together in the first VDHH, (four anchor cords) and cord 7′, 6′, 3′ and 2′ together in the second VDHH.
Approach the second petal (P2) to the first one and proceed in the same way.
Approach the third petal (P3) and proceed in the same way.
Knot cord 7, 6, 3 and 2 of the first petal again, to close the round.
From now on we will no longer have rows but rounds.
The figure represents in plan what is actually a circular work.
Round O – Same six knots as previous round.
Round P – Double the number of knots, using two anchor cords for the VDHH, instead of four.
Round Q, R, S, T, U, V – Make 12 knots per round.
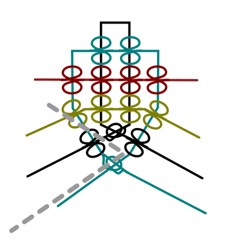
Round W* – Double the number of knot, using one anchor cord per knot, instead of two. To create the irregular edge of the corolla I used the “loop anchor cord with movable knot” technique.
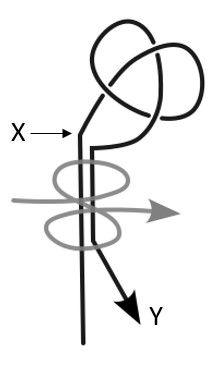
Before executing the VDHH, make a simple overhand knot on the single anchor cord * WITHOUT TIGHTENING IT *, keep it loose.
Then make the VDHH, using the whole folded loop as a anchor cord. Complete all round W this way.
At the end, the loop sticking from each knot has one side that is blocked (X) and the other part that can slip through(Y).
With the help of a pin, place the simple knot down on the blocked part X and tighten it.
Then close the loop by pulling the running end of the anchor cord(Y).
The loose end can be cut close to the end of the node.
If this technique resutl too complex, you can also opt to close the corolla with Horizontal Double Half Hitch.
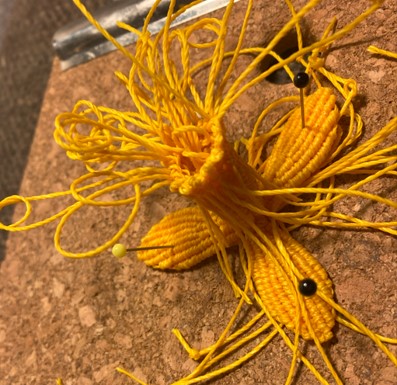
This is how the daffodil appears while working the last corolla’s round …. confusing and messy…..
Instructions Outer Petals Attachment and Calyx
After completing the corolla and the 3 external petals following the instructions in the previous sections, proceed as follows.
Each petal ends with 4 knots, each knot with 4 anchor cords (except the first which actually has 3 anchor cords + the knotting cord).
To attach the external petals to the body of the flower and continue working on the calyx, we will use cords 1, 4 and 5 and their symmetrical ones 1′, 4′, 5′, indicated in the previous figure with a circle.
Cords with an ‘X’ can be cut.
The (long) cord 8 of the first external petal will be the knotting cord for the calyx. Cord 8 of the other petals is incorporated with other anchor cords for a few knotting rounds and then cut.
With reference to the following figure, P1, P2 and P3 are the internal petals attached to the corolla, while P4, P5 and P6 are the external ones.
The figure represents in plan what is actually a circular work.
Pay attention that the faces of all the petals are now on their reverse side, while the calyx is worked straight and clockwise.
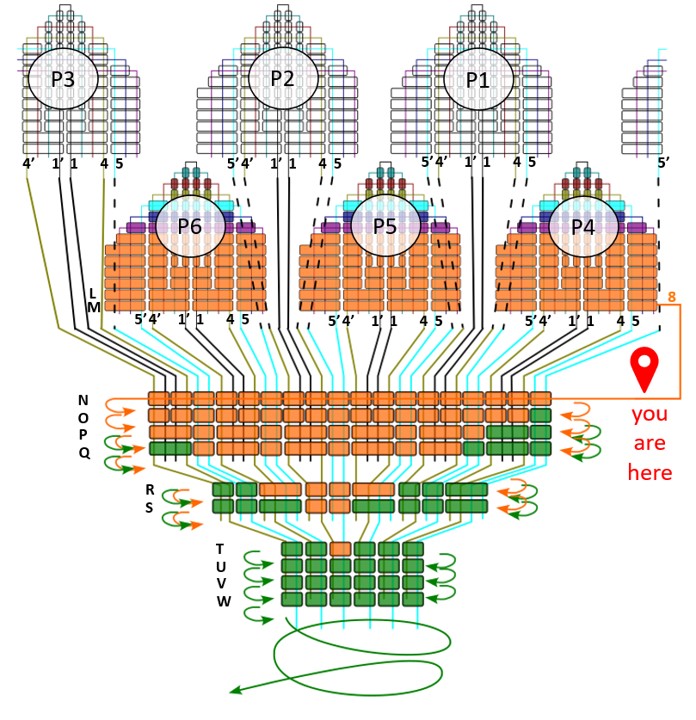
Round N – It uses cord 8 of the first external petal (P4) as a knotting cord.
The first external petal P4 is placed between two internal petals (P1 and P3 in figure) and the first VDHH is made by taking thread 5′ of the internal petal P3 and thread 5 of the external petal P4 as anchor cords. Then proceed taking the other petal P4 cords as anchor, two by two (4 and 1, 1’and 4′). Then again cord 5′ of the external petal and cord 5 of the internal petal. Then the cords of the internal petal P1 two by two. Proceed this way for all petals’ anchor cords.
Once round N is done, which ties the external petals to the body of the flower, it is time to insert the metal wire and the pistil inside the corolla/calix. The metal wire will support the stem. The pistil is a simple orange cord with one or two simple overhand knots on its top.
Round O – Same knots as round N. We have 18 knots. Insert the green cord which will be alternated with the yellow one, to form the calix design. Refer to the figure for the yellow/green cord alternation.
At the end of round O there are 18 knots.
Round P – We start to merge anchor cords, to begin to shape the calyx. Merging is alternate: two knots merged, one knot not merged, refer to the figure.
Round Q – Same knots as the previous one. At the end of round Q we have 12 knots. Start cutting the excess threads.
Round R – Merge knots alternately, so as to further tighten the calyx shape.
Round S – it is identical to the previous one and consists of 9 knots.
Round T – Knots are further merged in an orderly manner, so as to result in 6 knots in total.
Round U, V, W – execute 6 knots per round. Gradually cut the excess threads.
At the end we proceed by covering the wire and the remaining cords with Tatting Knots, or with another method as desired.
Instructions Leaves
The leaf is worked on four green cords. The knot used is the Double Half Hitch (DHH), vertical and diagonal. Also in this section colors used in figures are for the only purpose of facilitating anchor- and knotting- cord visibility.
Fold cord 1 in half and pin it on the macrame board. With all the other cords, position them in the middle of their length and execute a VDHH left and right, using the two running end of cord 1 as anchor cords, as shown in the figure.
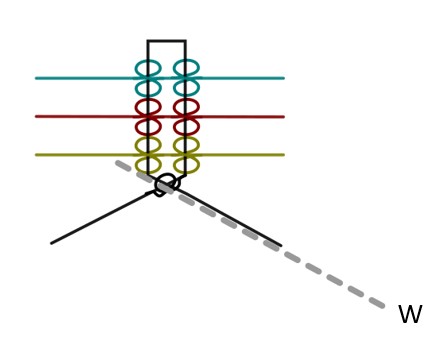
Execute a single half hitch on the middle with cord 1, using the left side as anchor and placing the 0.4 mm thick metal wire (W) next to it.
On the left side, bring cord 2 downwards and make VDHH with cords 3, 4 and 1, successively. Do the same thing on the right side.
Now bend the metal wire to the left, align the right part of cord 2 to it and use them as anchor for the half hitch knotted with the left part of cord 2.

Proceed this way, gradually bringing the cords down and knotting the others on the left side and on the right side. A half hitch is tied in the center by alternating the anchor and placing the metal wire next to it.
When the leaf has the desired length, collect the cords in the same bundle on the right and on the left and tie the leaf to the flower stem with tatting knots.
Credits and Acknowledgements
I learned the “loop anchor cord with movable knot” technique from macrame master Diana Poidimani, in her book “Essere Nodo”.
The leaf I used is learnt from Iva Baracco’s ” Fiori di Filo” book.
The flower is L’ila on earth design.
